How to Apply an Eye Makeup Look Using Cream & Powder Shadows
DISCLOSURE: This post may contain affiliate links. This means that, at zero cost to you, I may earn a commission when you purchase any products through these links. You can read more here.
Welcome back to Brenna Jeanette! I wanted to create a makeup look you could re-create with items you probably already have. If you missed my Instagram Reel, head over to watch this look. Is this something you would wear?
Let's start with the base...
First, I apply a foundation primer all over my face. Your skin type will determine which one you need (one that is hydrating or one for oil-control, for example). I used the Foundation Primer by Mary Kay – in my experience, this one has worked great for all skin types. I’ve tried a few different primers and always go back to this one!
Then I apply my foundation with a Liquid Foundation Brush. Today I used the Tarte Foundcealer in 16N. I love this one because it gives great coverage and a little dew without making my combination skin greasy.
To hid the dark circles under my eye & brighten that a bit, I used Tarte Shape Tape in 16N. I also apply this on acne and scarred spots. I don’t feel like this is too heavy but it does give a medium to full coverage.
To set underneath my eyes, I have been using the One/Size Ultimate Setting Powder in Translucent. This has helped keep my underye from creasing or getting oily throughout the day. I also take it along the sides of my nose since my foundation tends to run there. I applied this using the Real Techniques Setting Brush. It’s great for getting right underneath the eye and around the nose.
Lastly, I powder the rest of my face using Mary Kay Translucent Loose Powder. This is another ride or die product for me! You could also take the One/Size Utimate Setting Powder and apply that to the rest of your face. I was gifted the trial size to review so I can’t get my powder brush in the lid. I used this Powder Brush to apply.
Let's add some Dimension...
I then applied bronzer using a discontinued product by Mary Kay called Gilded Glow Bronzer. I love the tone of this one and haven’t found an exact replacement for it yet.
For highlighter, I used OFRA Highlighter in Soho. This is my favorite highlighter yet! I love the color, the color payoff, and it has lasted me forever so far. To apply the highlighter and blush, I use this Cheek Brush.
And for blush, I used the Tarte Amazonian Clay 12-Hour Blush in Quirky. I got this as my birthday gift from Tarte and the shade is gorgeous. A little goes a long way so just touch the brush in there – you do not need much!
Brows – I need them on. I used the Elf Instant Lift Brow Pencil in Blonde to shape and fill in the brow. The one thing I look for in brow pencils is a fine tip which this one is thicker – just throwing that out there! Then I applied the NYX Tinted Brow Mascara in Blonde as well. This is a little lighter than my brow color but it makes my brows blend in with my hair better.

Then the eyes...
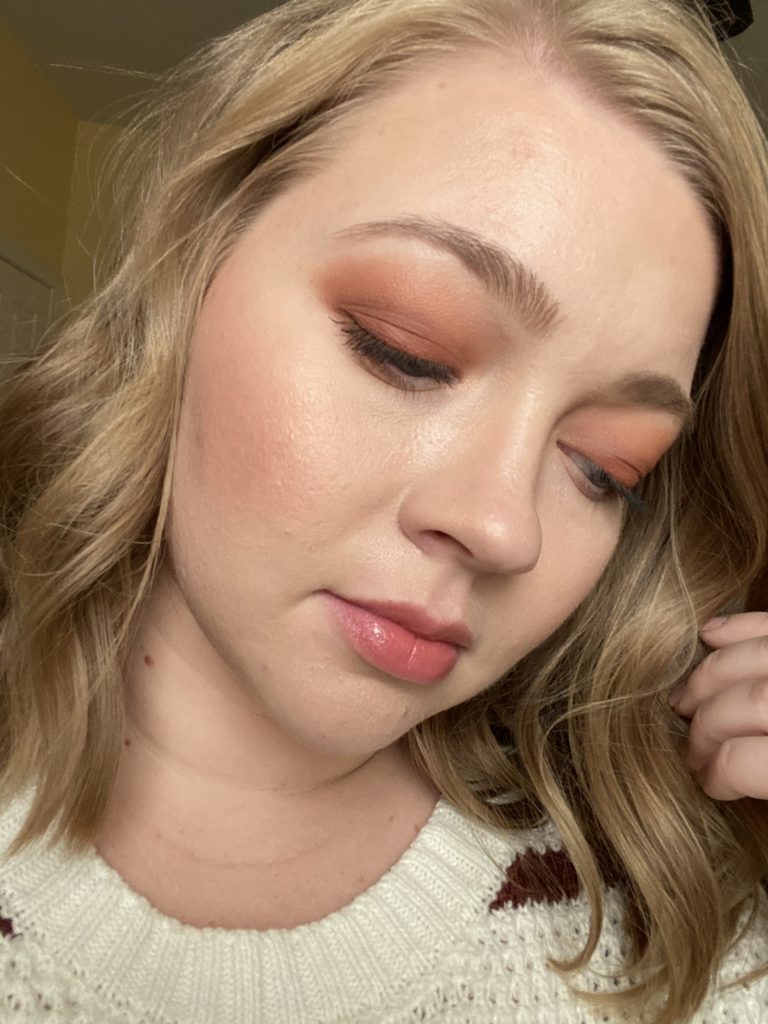
To start, I used the Smashbox Always On Cream Eyeshadow in Sienna. I applied this with Morphe Oval Shadow Brush (from the Eye Got This Collection) and focused on the outer 3/4 from under my crease to my lash line. I blended this with Lori Hogg’s Large Placement Brush (currently not available) to soften the edges.
Then I use the HIPDOT Zion Palette for the rest. I used Maze as my transition color in and slightly above the crease with the Morphe Pro Firm Blending Crease Brush (from the Eye Got This Collection). Then applied Grounded with Luxie 209 Large Shader in the crease and Vibration with Luxie 207 Medium Angled Shading on the outer corner. The shade Virgin is my shimmer shade and I applied that along the lash line up to my crease (1/4-1/2 of my lash line) with Lori Hogg Pencil Tip Shader (currently not available).
I take Maze along 3/4 of my lower lash line, Grounded about 1/2 of my lower lash line, and Vibration on the outer 1/4 of my lower lash line. I created an ombre effect with the darkest shade on the outer corner. Used Mary Kay Eye Smudger Brush to apply all three shades.
Using the Luxie 211 Concealer Brush, I applied Sandstone below my brow bone to brighten and clean that area up. And topped it with a little bit of Virgin to give it a little shimmer
For some shimmer on the inner corner, I used the OFRA Highlighter in Soho with the Lori Hogg Pencil Tip Shader (currently not available).
To add some depth to my eyes, I applied a thin layer of liquid brown eyeliner using the Araceli Ojos Perfectos Liquid Liner in Coffee.
And for lashes, I applied two coats of Lilly Lashes Triple X Mascara.
Finishing Touches...
For lips, I used Saint Luxe Lip Liner in Love Letter and layered a nude gloss on top, Mary Kay Cafe Au Lait which is discontinued but here is a similar color.
For finishing spray, I have been using the Skindinavia Makeup Finishing Spray.

I love the reddish browns lately and the Smashbox Cream Eyeshadow and the Hipdot Zion Palette mixed so well together! I hope you enjoyed this tutorial! Is this something you would recreate? Let me know what look you’d like to see next in the comments!